Pressure Measurement
Pressure Sensor Accuracy
When using a pressure sensor to measure pressure, one of the first questions that comes up is accuracy: How closely does the value reported by the pressure sensor come to the actual pressure? We use the term accuracy, but what we really want to know is the error of the pressure measurement. This article will describe standard specifications and methods for calculating sensor accuracy.
The definition of sensor accuracy actually defines error, and the two terms are used more or less interchangeably: The accuracy of the sensor is the simply the difference between the pressure reported by the sensor and the actual pressure, expressed as a percent of the sensor full scale. For example, if a pressure sensor with a full scale range of 100 psi reports a pressure of 76 psi – and the actual pressure is 75 psi, then the error is 1 psi, and when we divide this by the full scale and express it as a percentage, we say that accuracy (or error) of the sensor is 1%. Most industrial sensors are better than that, with specified accuracies of +/-0.25% or +/-0.1% of full scale (FS). So the error of a 100 psi FS sensor with an accuracy of +/-0.1% FS will not exceed +0.1 psi or -0.1 psi – at any point in the measurement range of the sensor.
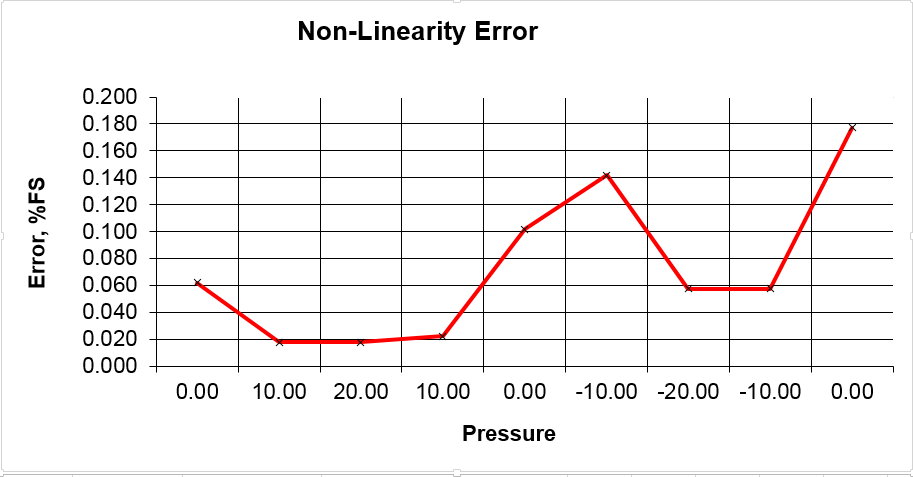
Sensor accuracy is comprised of two error modes: Non-linearity and Hysteresis. Ideally, pressure sensors are perfectly linear – the output signal or reading is directly proportional to the applied pressure. Because sensors are mechanical devices, however, they are not perfectly linear, and this error is called non-linearity. Non-linearity is determined by the five-point calibration method. A pressure standard (a device know to be at least five times more accurate that the pressure sensor) is used to apply pressures at 0%, 50%, 100%, 50% and 0% of the sensor full scale. A best-fit straight line is fitted to these points, and the maximum deviation of any of the five points from the value predicted by the best-fit line, is defined as the non-linearity error.
Hysteresis is simply the difference in the value of the readings at the same pressure along these five calibration points, up-scale and down-scale. Hysteresis can be measured from the readings at the 50% points and at 0% FS pressure. The greatest difference in any of these is defined as the hysteresis.
The accuracy of the sensor is defined to be the sum of the non-linearity error and the hysteresis error.
Note that the sensor accuracy calculation is pretty much the worst case error that can be determined from the calibration data, and it may not occur at every point along the pressure sensor FS range. But this is considered to be a conservative method for calculating the error present at any pressure over the range of the sensor.
For differential pressure sensors – those having a plus and minus full scale range, the same techniques are used to calculate accuracy with the addition of -50%, -100%, -50% and 0% calibration points required (9 all together).
Spreadsheets that automatically calculate non-linearity, hysteresis and accuracy are available from Validyne for gage, absolute and differential pressure sensors. Factory calibration sheets showing these errors are shipped with most sensor models.
Comments are closed

